Video Chat Onboarding: Start Here

Welcome to Video Chat. Soon, your sales reps will be able to generate hot leads by meeting with inbound prospects online. To get you set up with this functionality, we have provided you with some tutorials to help you and your team drive more sales from Video Chat:

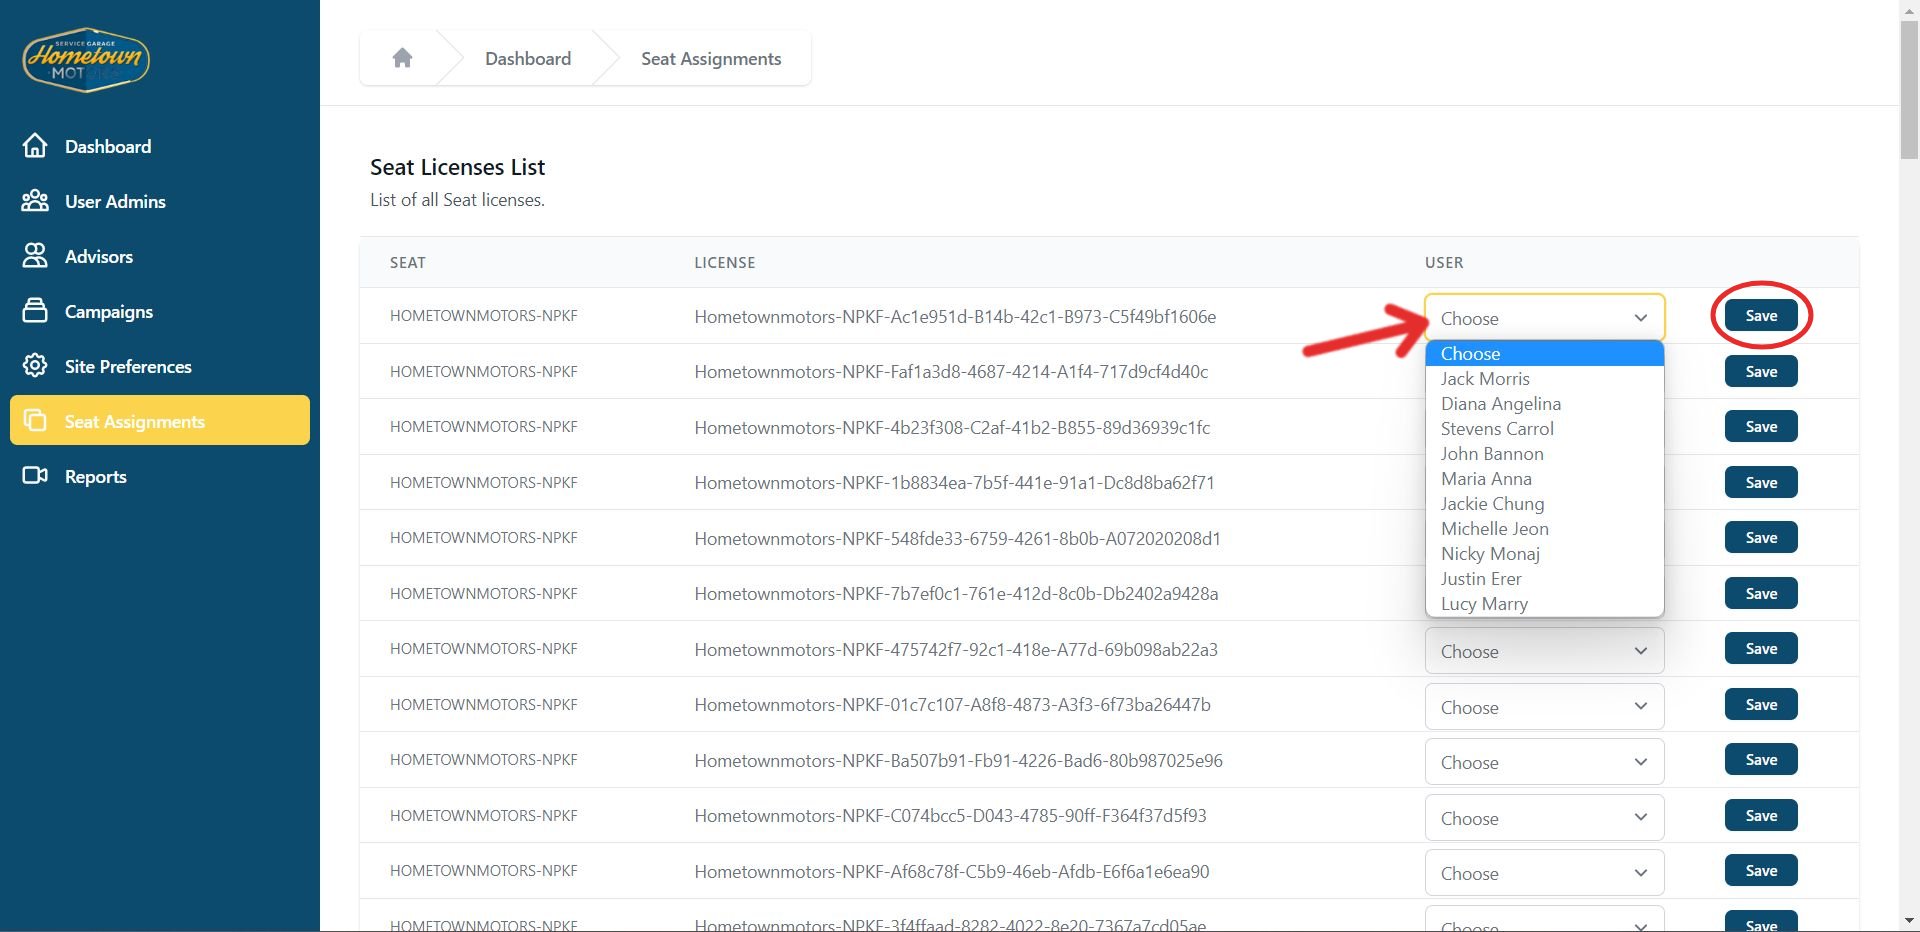
  1. Admin onboarding – This shows you, the administrator, how to a login and use your dashboard. This is the document you are currently perusing.
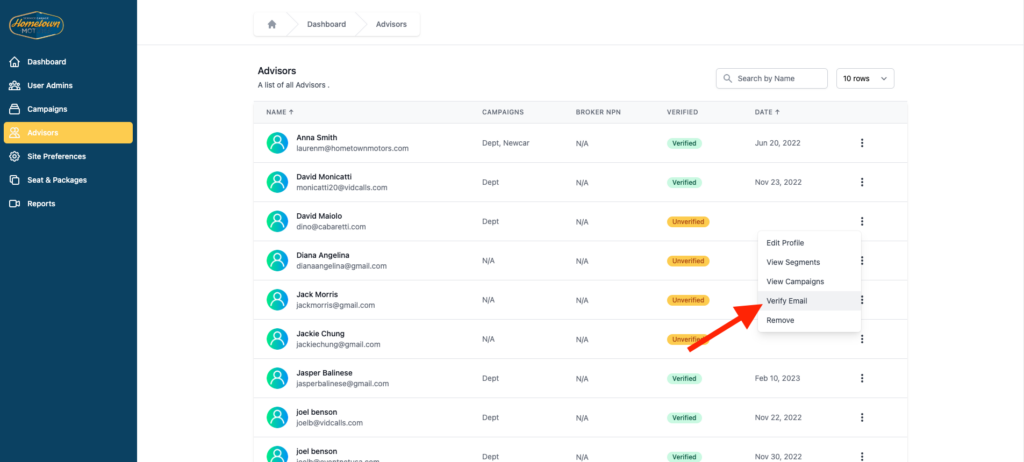
  2. Advisor onboarding – this tutorial will show you how to get your sales people signed up and registered. Each sales person gets his/her own dashboard.

Video Chat Admin Onboarding:

Let’s get started. To begin, click on each tab to the left (on desktop) or below (on mobile), starting with LOGIN. work your way down, following the instructions on each tab. Once completed, you will know how to login and manage your Video Chat Admin account.

Login

Our support team has already registered and granted you access. All you need to do is login to your dashboard using the credentials given to you by your Video Chat account representative. If you have not received your login url, username and password, please contact support at lendhisupport@videoshaleschat.com.

Screenshot 1: Dashboard Login
[ultimate_spacer height=”50″]

Getting to Know Your Dashboard

Once you’re logged in, you will be redirected to your admin dashboard within the system. It will have a left sidebar and your company logo in the top left corner. Feel free to familiarize yourself with the dashboard. You can always return to the Home page by clicking either the house icon in the top left corner or by clicking Dashboard in the left sidebar.

Note that customizations for your landing page, thank you page, and sorry page are all located in the Site Preferences tab in the left sidebar, but we’ll get to that in step 6. For now, lets proceed to step 2, adding other admins to your campaign.

Adding New Administrators

You have already been added as an administrator by the Video Chat team. If you wish to add more admins to help you manage your account, you can add them here.

  1. Go to User Admins in the side bar.
  2. Click Add Admin (see Screenshot 1A below)
Screenshot 1A

Complete all fields

The next screen will provide you a web form to fill out. Fill in all the details for your new admin. When you click the blue Save button, the new admin will automatically be notified via email (see Screenshot 1B below).

Note: The phone number is not important. The field needs to be completed, but the phone number does not need to be accurate.

Screenshot 1B

Add or Remove an Admin

The steps below will be used for both verifying or removing an admin.

  1. Return to the User Admins page
  2. Find your Admin in the list on the page and click the three dots to the right of his or her name.
  3. To complete adding your Admin, click on Verify Email. Once clicked, administrative permissions will be immediately granted. Or…
  4. To delete an Admin, click on Remove to delete an Admin along with all of the video chat data associated with them.
Screenshot 1C

Note on Advisors: Before adding advisors to your campaign, they must already be included in your list of available advisors. All available advisors should have been added by your Video Chat representative or by someone else on your team. If not, you can learn how to invite advisors by contacting support at lendhisupport@videoshaleschat.com. Once advisors have been added to the Video Chat platform, you can then add them to your campaign by following the steps below.

Add Advisors to Your First Campaign

A Campaign in Video Chat is similar to a marketing or advertising campaign for your company. We have already created your first campaign for you. The goal is to help drive new sales for your team by giving key advisors the opportunity to meet with prospects online, face-to-face. By following the steps below, you can add the advisors you want to participate in this campaign:

  1. In the left sidebar, choose the Campaigns tab.
  2. Click on the pre-loaded campaign container box (Example “Bali” in Screenshot 2A below).
  3. Click the Advisors tab.
  4. Click on Invite Advisors in the drop down list (screenshot 2B).
  5. In the following screen, you’ll see a list of available advisors (pre-added to your account). You can add any advisors to your campaign by clicking on Add to Campaign next to their names in the list of available advisors. Once added, their status will change from Unverified to Verified.
Screenshot 2A
Screenshot 2B

Choose Your Segment

A Segment in Vidcalls is a department such as Sales, Finance, Service, etc. For now, Sales is the only segment we’ll use, but we still need to complete this process. To allow your agents in your Campaign to accept calls for Sales, you’ll need to go back to your dashboard:

  1. In the left sidebar, choose the Campaigns tab.
  2. Click on the Segments tab.
  3. Click the 3 dots on the far right of the list as seen in Screenshot 3.
  4. Click Add More Members to add your advisors from the dropdown list to your campaign. Make sure you add the same advisors here that you added to your Campaign in the previous step.

Note: Any advisors already added to the Segment will not be in the dropdown list.

Screenshot 3: Segments

Assign Seats

Seats are created for national campaigns. At the moment, your campaign is local, but in the current beta version of Vidcalls, seat assignments must still be selected. So all Vidcalls admins must complete the following steps.

  1. In the left sidebar, scroll down to Seat Assignments.
  2. Click the 3 dots in the right column.
  3. Choose Seat Assignment as shown in Screenshot 4.
  4. You’ll see a list of available seats with the headings Seat, License & User (Screenshot 4.1).
  5. Under User, click the Choose dropdown field in the first row and you’ll see a list of available Advisors as seen in Screenshot 4.1.
  6. Chose an available Advisor. Make sure you’re choosing the same advisors you’ve chosen for your campaign.
  7. Click Choose in each consecutive row to add more advisors. Note: Any advisors already assigned to a seat will not be listed.
  8. Click Save to save your changes.

Once seats are assigned, your advisors can start taking incoming Video Chat calls as long as they have set up their accounts.

The next two steps are optional.

Screenshot 4: Seat Assignment
Screenshot 4.1: Seat Selection

Verify Your Advisors (optional)

Once seats have been assigned, you can now verify your Advisors.

  1. Go back to the Advisors tab.
  2. You’ll see a list of advisors. Under the Verified column, advisors will either have a green Verified status or yellow Unverified status.
  3. If there are any advisors who are unverified, click on the three vertical dots in the far right of the row. Click Verify Email.

Do this step for each advisor you want to be a part of your campaign.

Set Your Preferences in Your Admin Dashboard

Your account is created with Video Chat default settings. The Site Preferences tab is where you can customize your landing page, dashboard and other pages that are visible to your customers.

When you navigate to the Site Preferences tab, you will see 5 additional vertical tabs, just to the right of the blue sidebar. These tabs are:

Client Content Setup
Campaign Landing Page
Meeting Sorry Page
Thank You Page
Feedback Page

All five tabs are explained below. It’s best to open both your dashboard and landing page in another browser tab so you can make changes and view them as you proceed through this tutorial.

Client Content Setup

In this section, you will find general setup selections for your account.

  1. Colored Logo/White logo – Upload your Colored Logo for your landing page header. It will be placed in the top left corner of the page. If you have a lighter version of your logo, you can upload it to the White Logo area. It will be displayed on your dashboard.
  2. Landing Page Color Setting – Below the logos, you can set the custom colors for your landing page. We recommend trying different colors and refreshing your landing page to see which ones match your style preferences.
  3. Dashboard Color Setting – If you prefer to set different colors for your dashboard, you can do it here. This page is only visible to admins.
  4. User Definition – We refer to your sales reps as Advisors. If you want to give them another designation, such as Team Member or Account Representative, type it in the User Definition field. The designation will appear on the landing page instead of the term Advisor.
  5. API Key – Leave the API Key blank for now.

Campaign Landing Page

Below are the settings to customize your landing page. It helps to be viewing your landing page in another tab as you proceed through this tutorial so you can have a visual representation of the page.

  1. Language Preference – Currently you can select between English and French for your landing page. If you select French, any inputs written in English will be auto translated into French using Google Translate. The Google translation tool is not perfect so we encourage you to have someone who is fluent in French edit the translation.
  2. Landing Page Title (nationwide campaign) – If your campaign is targeted to a nationwide audience, you can create a custom landing page title here. For most of you, you’ll leave this section blank.
  3. Landing Page Title (Segment Campaign) – For campaigns that target a local audience, you can create your own custom landing page title here. Make sure it is clear and compelling. Try to keep it less than 12 words in length.
  4. Landing Page Subtitle – Describe in further detail what you want your landing page visitors to do. Use it to add clarity to your page title. The subtitle should be 20-30 words in length.
  5. Landing Page Helper Text – You can change the copy that is directly under the call-to-action button on the landing page. We encourage you not to change this section and to keep the default text as it is since it ensures the user’s privacy.
  6. Landing Page Connect Button Text – You can change the text on the call-to-action button. The default text is Connect Now! We suggest keeping all CTA button text to as few words as possible.

Meeting Sorry Page

When a customer initiates a Video Chat and there are no team members available, the call request will eventually time out. When this happens, a Sorry page is rendered. On the Sorry page, the user can fill out a form to request a call back by one of your team members. This tab allows you to customize this page and form.

  1. English or French – At the top of the Meeting Sorry Page editor, you can select English or French.
  2. Sorry Page Title – You can customize your own page title here. Try to keep it between 12-15 words.
  3. Sorry Page Subtitle – Use the subtitle to encourage your caller to leave their information and assure them that they will get a prompt response.
  4. Field Labels – You cannot customize the actual fields on Sorry Page web form, but you can choose your own field labels. There is little reason to do this since our default labels are clear and concise.

Thank You Page

When a Video Chat is completed, the user is presented with a Thank You page, which also includes a short survey. The survey is not customizable at this time, but the page title and subtitle are.

  1. English or French – Again, you can choose between English and French
  2. Thank You Page Title – Thank your caller for contacting you. You can change the title, but try to keep it within a few words.
  3. Thank You Page Subtitle – Edit the subtitle. You can customize it anyway you want, but try to keep it 2-3 lines of text at the most.

Feedback Page

The feedback page is for your internal use only. It’s a form that your advisors must fill out after each call in order to keep receiving new calls.

  1. English or French – Again, select English or French.
  2. Feedback Body Copy – This is your message to your team members. When editing this text, make sure they know how important it is to complete the form. If they don’t, they can be restricted from getting more calls and your business will lose out on important call data.